Mummy Cupcakes Recipe: A Spooktacular Treat for Halloween
Why homemade Mummy Cupcakes are a must this Halloween?
When it comes to celebrating Halloween, there’s nothing quite as delightfully eerie as baked goods that evoke the spirit of the season. Enter the Mummy Cupcakes Recipe—a simple yet festive treat that’s sure to become a favorite among family and friends. Picture creamy frosting artfully draped across fluffy cupcakes, creating a whimsical mummy-like appearance that will charm every guest at your Halloween gathering.
But why go the homemade route? Not only does baking your own Mummy Cupcakes allow for customization (think of adding your favorite flavors or dietary alternatives), but it also sets the stage for some quality bonding time. Get your friends or little ones involved in the decorating process. The laughter and fun you’ll share during this activity is truly priceless! Plus, you can control the ingredients, ensuring that your cupcakes are made with love and no unnecessary additives.
Easy Ingredients for Your Mummy Cupcakes
The beauty of this Mummy Cupcakes Recipe lies in its simplicity. Here’s what you’ll need:
-
For the cupcakes:
-
1 box of chocolate or vanilla cake mix
-
Ingredients as listed on the box (usually water, eggs, and oil)
-
For the frosting:
-
2 cups of powdered sugar
-
1/2 cup of unsalted butter
-
2 tablespoons of milk
-
1 teaspoon of vanilla extract
-
For mummy decor:
-
Candy eyes (store-bought or homemade)
-
Extra frosting for mummy wraps (thinned with a few drops of milk)
Why They’ll Be a Hit
These spooky cupcakes not only look fantastic but taste amazing, too! According to a survey on Halloween treats, over 68% of people prefer homemade goodies during this festive season, and nothing beats cupcakes. They’re portable, easy to serve, and every bite is a perfect balance of sweetness with a decadent frosting that melts in your mouth.
So, this Halloween, try your hand at the Mummy Cupcakes Recipe. They’re not just a treat; they’re an experience that creates memories. Share your creations on social media or start a fun competition among friends—who can decorate the spookiest mummy? Trust me, the spirit of Halloween will be alive and thriving in your kitchen!
Ingredients for Mummy Cupcakes
When preparing your delightful Mummy Cupcakes, having the right ingredients on hand is key to crafting these spooky treats. Let’s break it down!
Essential cupcake ingredients
To create the perfect cupcake base, you will need:
- 1 ½ cups all-purpose flour: Provides structure to your cupcakes.
- 1 cup sugar: Adds sweetness—who doesn’t love a touch of sweetness?
- ½ cup unsalted butter, softened: For moistness and a rich flavor.
- 2 large eggs: Acts as a binder and enhances texture.
- 1 cup buttermilk: Keeps your cupcakes soft and fluffy.
- 1 ½ teaspoons baking powder: Helps your cupcakes rise beautifully.
- 1 teaspoon vanilla extract: Adds that signature flavor!
Frosting and decoration essentials
Now, let’s make these cupcakes really come to life with some fun decorations. For the frosting and spooky touches, stock up on:
- 1 cup of cream cheese frosting: A tangy twist that perfectly complements your cupcakes.
- 1 cup of whipped cream or vanilla frosting: To create the ‘mummy bandages’ look.
- Candy eyes: These little touches will make your cupcakes come alive.
- Chocolate chips or sprinkles: For an added crunch and festive flair.
Feel free to explore cool options for frosting recipes and enhance your Mummy Cupcakes Recipe even further! Curious about tips on decorating your treats? Check out this detailed guide on cupcake decoration.
With these ingredients, you’re on your way to baking some unforgettable Mummy Cupcakes! Enjoy the process and let your creativity shine.
Step-by-step Preparation of Mummy Cupcakes
Creating Mummy Cupcakes is not just about baking; it’s an experience filled with creativity and fun, perfect for gatherings, especially around Halloween. Follow this step-by-step guide to make these delightful treats that not only taste great but also look adorable.
Baking the cupcakes
The first step in your Mummy Cupcakes Recipe is to prepare the base. Start by preheating your oven to 350°F (175°C) and lining a cupcake tin with paper liners.
For the cupcake mix, you can go with a simple vanilla or chocolate cake recipe. Here’s a quick version:
- Ingredients:
- 1 ½ cups all-purpose flour
- 1 cup sugar
- ½ cup unsalted butter, softened
- 2 large eggs
- ½ cup milk
- 1 ½ teaspoons baking powder
- ½ teaspoon vanilla extract
- A pinch of salt
Combine the flour, sugar, baking powder, and salt in a bowl. In another bowl, cream the butter and sugar until light and fluffy, then add eggs one at a time, followed by vanilla. Gradually mix in the dry ingredients and milk until smooth.
Fill each cupcake liner about two-thirds full and bake for 18-20 minutes, or until a toothpick comes out clean. Once done, let them cool completely on a wire rack.
Preparing the frosting
While your cupcakes cool, let’s whip up some frosting. You’ll need:
- Ingredients:
- 1 cup unsalted butter
- 4 cups powdered sugar
- 2-3 tablespoons milk
- A teaspoon of vanilla extract
Beat the butter until creamy, then gradually add the powdered sugar, mixing well after each addition. Add vanilla extract and enough milk to reach your desired consistency. For a fluffier texture, mix for an additional few minutes.
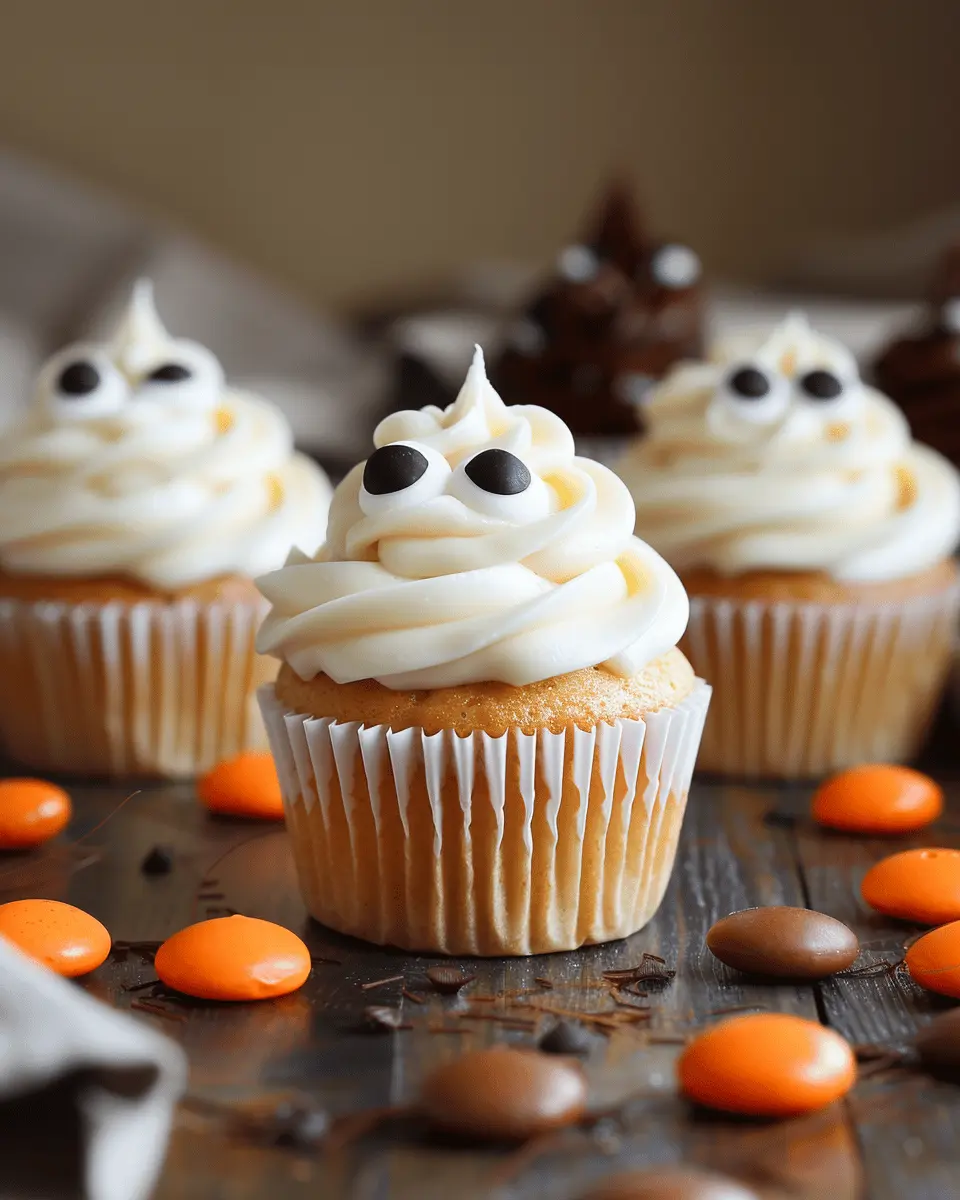
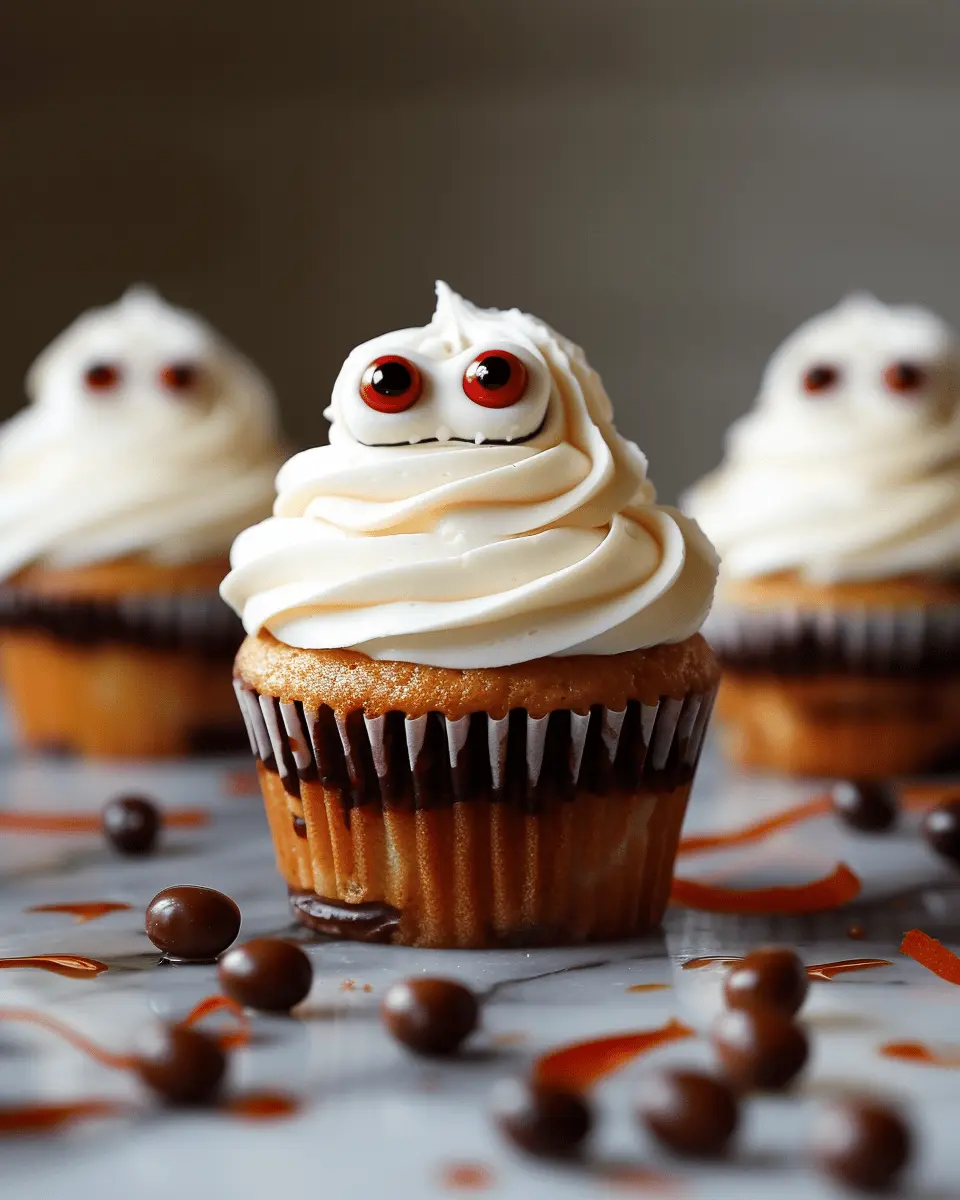
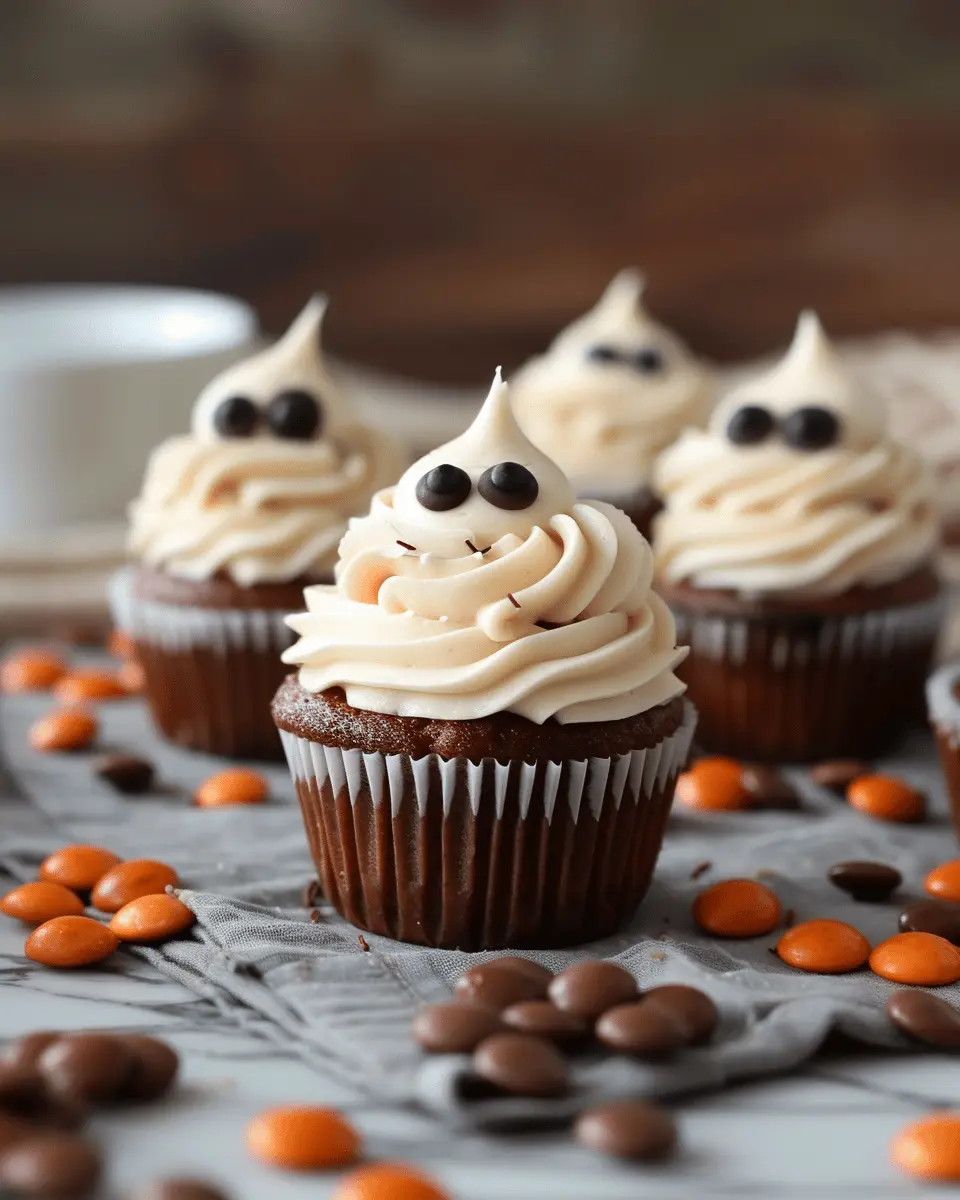
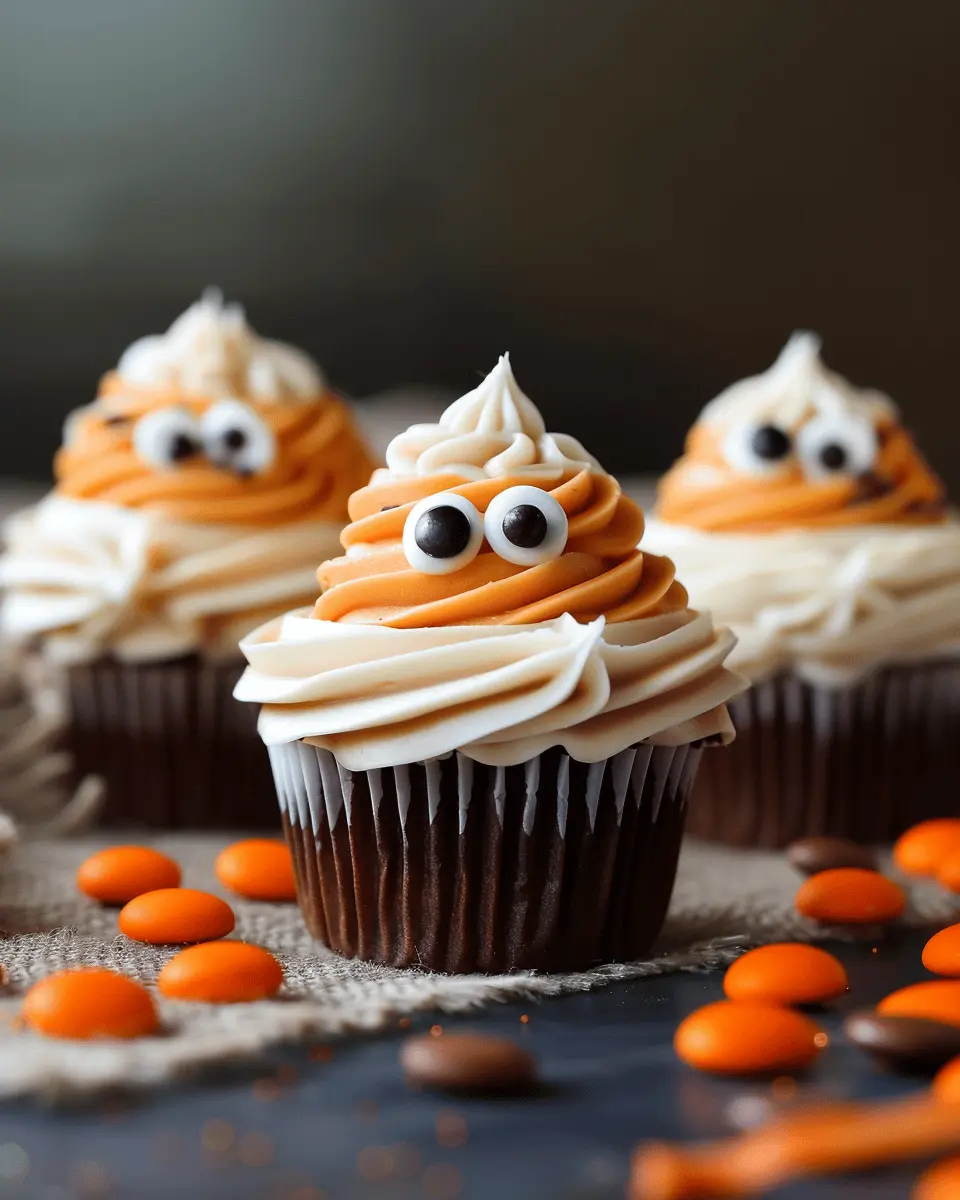
Attaching the candy eyes
Now comes the fun part! Once your cupcakes are cool and your frosting is ready, it’s time to add the features of our mummy. Using your favorite candy eyes, place two on each cupcake, slightly pressing them into the frosting for better adherence. You could use chocolate chips or M&M’s as alternatives if you’re in need of a substitute.
Piping the mummy bandages
The centerpiece of our Mummy Cupcakes Recipe is obviously the bandages! For this, safely transfer your frosting into a piping bag fitted with a star tip or just cut a small hole in the bag.
Starting at the top of the cupcake, begin piping back and forth to create the bandage effect. Don’t worry about perfection; in fact, the irregularities add to the mummy’s charm. Aim for a look that’s messy yet cute!
Adding detailed decorations
Once your bandages are in place, feel free to go wild with additional decorations. You can sprinkle edible glitter, chocolate sprinkles, or even tiny candy bats to amp up the Halloween feel.
Additionally, you could drizzle some melted chocolate over the bandages to add depth in color or flavor. Having a little creativity here can truly make your cupcakes stand out.
Setting the cupcakes
After assembling your mummy masterpieces, the only thing left is to let them set. Place them in the fridge for about 30 minutes to firm up the frosting slightly. This not only enhances their flavors but also ensures your decorations stay intact when serving.
When it’s time to present these delightful Mummy Cupcakes, consider using a festive cupcake stand or placing them in individual, themed wrappers. They’re sure to be a hit at your next party!
Now you’re ready to impress friends and family with these deliciously spooky treats. Enjoy baking, decorating, and, most importantly, indulging in your creation!
Variations of Mummy Cupcakes
Fun Color Twists
Who says Mummy Cupcakes have to be just black and white? Get creative with colors that can set the tone for your spooky soirée! Instead of traditional white icing, why not try orange or green frosting for a fun twist? You can achieve these vibrant hues by adding food coloring to your favorite frosting recipe. A splash of orange could scream Halloween, while green might evoke a more ghoulish vibe. Consider spreading some colored icing underneath the “bandages” to create a unique layered look that guests will adore. Check out Color Kitchen for natural food color options that won’t compromise the quality of your frosting.
Flavor Variations for the Batter
While chocolate and vanilla are always crowd-pleasers, exploring different flavor profiles for your Mummy Cupcakes Recipe can give an unexpected delight to your guests. Imagine the surprise on their faces when they bite into a chocolate mint cupcake dressed as a mummy! Adding peppermint extract to your chocolate batter can unleash an exhilarating freshness that complements the richness of the cocoa.
If you’re feeling adventurous, consider using a red velvet base. Not only does it add a dramatic flair, but pairing it with cream cheese icing gives a deliciously rich flavor. Alternatively, spice it up with a pumpkin batter during fall; the cozy notes of cinnamon and nutmeg will perfectly align with any Halloween theme. Whichever flavor you choose, balance is key—make sure the frosting complements the batter to create a harmonious dessert experience.
By embracing these variations, you not only elevate the Mummy Cupcakes but also brand your culinary creations with a touch of your unique personality. Don’t forget to share your flavorful creations and inspire others!
Cooking Tips and Notes for Mummy Cupcakes
When it comes to your Mummy Cupcakes Recipe, getting the frosting just right can make all the difference. Here are some best practices to elevate your cupcake game:
Best Practices for Frosting
- Consistency is Key: Aim for a medium-stiff consistency in your frosting. This helps in creating those adorable mummy wraps. If it’s too soft, it may not hold its shape.
- Use a Piping Bag: A piping bag will give you more control than a spatula. For the mummy look, use a round tip or a star tip for different textures.
- Chill Before Decorating: Allow your cupcakes to cool completely before frosting. This prevents melting and ensures your frosting stays bold and beautiful.
Storing Tips for Decorated Cupcakes
Once your mummy cupcakes are beautifully decorated, proper storage is essential:
- Room Temperature: Store your unwrapped cupcakes at room temperature for up to three days. Use a cake dome to prevent drying out.
- Refrigeration: If you’ve used cream cheese or a whipped frosting, refrigerate them. Just let them come to room temperature before serving for the best flavor.
- Freeze for Later: You can freeze undecorated cupcakes for up to three months. When you’re ready, simply thaw and decorate as desired.
For more tips on baking and decorating, check out resources from baking experts like The Kitchn or Bakerella. Happy baking!
Serving Suggestions for Mummy Cupcakes
Pairing with Themed Treats
When presenting your Mummy Cupcakes, think about creating a complete Halloween-inspired spread. These delightful cupcakes pair wonderfully with treats like candy corn, ghost-shaped cookies, or even mini pumpkin pies. For something savory, consider adding a platter of bat-shaped turkey bacon appetizers. You can find some fun recipes for themed snacks on Food Network, which could inspire your Halloween gathering.
Creative Serving Ideas for Parties
To make your Mummy Cupcakes the star of the show, consider creative serving options. Serve them on a spooky-themed platter, surrounded by plastic spiders or faux cobwebs for that extra frightful flair. You could also use cupcake stands at varying heights, which adds visual interest. And for a unique touch, offer a side of candy eyeballs that guests can place atop their cupcakes for a fun DIY element.
With these serving suggestions, your Mummy Cupcakes Recipe will not just be a treat; they’ll create memorable moments at your gathering!
Time Breakdown for Mummy Cupcakes
Preparation Time
Getting started with your Mummy Cupcakes Recipe is half the fun! You’ll want to carve out about 20 minutes to gather your ingredients and whip up that delicious batter. This is where you can let your creativity flow, mixing up flavors and perhaps even adding a twist to your regular cupcake base!
Baking Time
Once your batter is ready, pour it into your cupcake liners and pop them in the oven. The baking time is typically around 15 to 20 minutes. Keep an eye on them as they rise; that delightful aroma will fill your kitchen in no time!
Total Time
In total, you’re looking at about 40 to 45 minutes to create these festive treats. It’s a pretty quick process, making it the perfect afternoon project—especially when you want to impress friends or family. For more baking tips, check out resources from the American Baking Guild or find inspiration on Food Network.
Nutritional Facts for Mummy Cupcakes
When indulging in delightful treats like our Mummy Cupcakes, it’s good to know what you’re enjoying! Here’s a closer look at the nutritional content.
Caloric Content
Each cupcake packs approximately 250 calories. This delicious treat can fit into your daily intake without feeling guilty. Just remember that moderation is key!
Sugar Levels
These scrumptious cupcakes contain about 15 grams of sugar. While that might sound high, it’s worth savoring an occasional sweet moment. You could also explore low-sugar alternatives if you’re keeping an eye on your intake.
Other Nutritional Aspects
Beyond the sugar and calorie count, Mummy Cupcakes provide essential nutrients, including calcium and iron from the frosting and cake ingredients. If you’re looking for more healthy options, consider adding whole grain flour or even some fruit puree for a nutritious twist.
For further insights into cupcake nutrition, check out Healthline and Nutrition.org! Enjoy your baking adventure!
FAQ about Mummy Cupcakes
Can I use a gluten-free cake mix?
Absolutely! If you’re looking for a gluten-free option, you can easily substitute a gluten-free cake mix in your Mummy Cupcakes Recipe. Just make sure to follow the instructions on the package carefully, as baking times might vary slightly compared to traditional mixes. Additionally, opt for gluten-free frosting to ensure everything is safe for those with gluten sensitivities.
How long do mummy cupcakes last?
When stored properly, mummy cupcakes can last for up to 3-5 days at room temperature. If you want them to stay fresh for longer, consider refrigerating them, where they can last about a week. Just remember to keep them in an airtight container to maintain moisture and avoid drying out. For extra flavor, you can even freeze them for up to three months—just thaw them in the fridge when you’re ready to indulge!
What’s the best way to transport decorated cupcakes?
Transporting your beautifully decorated mummy cupcakes can be a bit tricky but doable! Here are some tips to make sure they arrive in one piece:
- Use a cupcake carrier: These are specifically designed to hold cupcakes securely and often come with a lid to keep them from getting squished.
- Chill before transport: If you’ve used a particularly soft frosting, chilling the cupcakes in the fridge for about 30 minutes before transport will help set the frosting.
- Avoid stacking: If you have to stack cupcakes, place a piece of parchment paper between layers to prevent sticking.
By following these tips, you’ll make sure your mummy cupcakes are ready to steal the show, whether it’s a party or a simple gathering. Interested in more decorating tips? Check out this guide on cupcake decoration here.
Conclusion on Mummy Cupcakes
Summing up the spooky fun of homemade treats
These Mummy Cupcakes are a delightfully creative way to celebrate the Halloween season. Not only are they easy to make, but they also allow you to unleash your inner artist while decorating. Each bite offers a moist, flavorful experience that will have your friends and family coming back for more.
Making these treats can turn an ordinary evening into a memorable occasion. Whether you’re hosting a Halloween party or just enjoying a cozy night in, preparing this Mummy Cupcakes recipe adds to the festive spirit. Be sure to check out other spooky dessert ideas here to keep the fun going all season long. So, roll up your sleeves and get ready to impress with deliciously spooky treats!
PrintMummy Cupcakes Recipe: Easy Halloween Treats Your Kids Will Love
Delight your kiddos this Halloween with these spooky yet delicious Mummy Cupcakes! They are easy to make and perfect for Halloween celebrations.
- Prep Time: 20 minutes
- Cook Time: 20 minutes
- Total Time: 40 minutes
- Yield: 12 cupcakes 1x
- Category: Desserts
- Method: Baking
- Cuisine: American
- Diet: Vegetarian
Ingredients
- 1 box chocolate cake mix
- 1 cup water
- 1/2 cup vegetable oil
- 3 large eggs
- 1 cup chocolate frosting
- 12 candy eyes
- 1 cup white chocolate chips
Instructions
- Preheat your oven to 350°F (175°C).
- Prepare the cupcake batter according to the instructions on the cake mix box, blending in water, oil, and eggs.
- Pour the batter into cupcake liners in a muffin tin and bake for 18-20 minutes.
- Let cupcakes cool completely before frosting.
- Melt white chocolate chips in a microwave-safe bowl and stir until smooth.
- Use a fork to drizzle the melted white chocolate over the frosted cupcakes to create a mummy wrap effect.
- Attach two candy eyes to each cupcake immediately after drizzling.
Notes
- For a chocolate drizzle effect, you can also use dark chocolate melting wafers.
- These cupcakes can be made ahead of time and decorated just before serving.
Nutrition
- Serving Size: 1 cupcake
- Calories: 250
- Sugar: 18g
- Sodium: 230mg
- Fat: 9g
- Saturated Fat: 3g
- Unsaturated Fat: 4g
- Trans Fat: 0g
- Carbohydrates: 39g
- Fiber: 1g
- Protein: 3g
- Cholesterol: 40mg
Keywords: Mummy Cupcakes, Halloween Treats, Kids Desserts