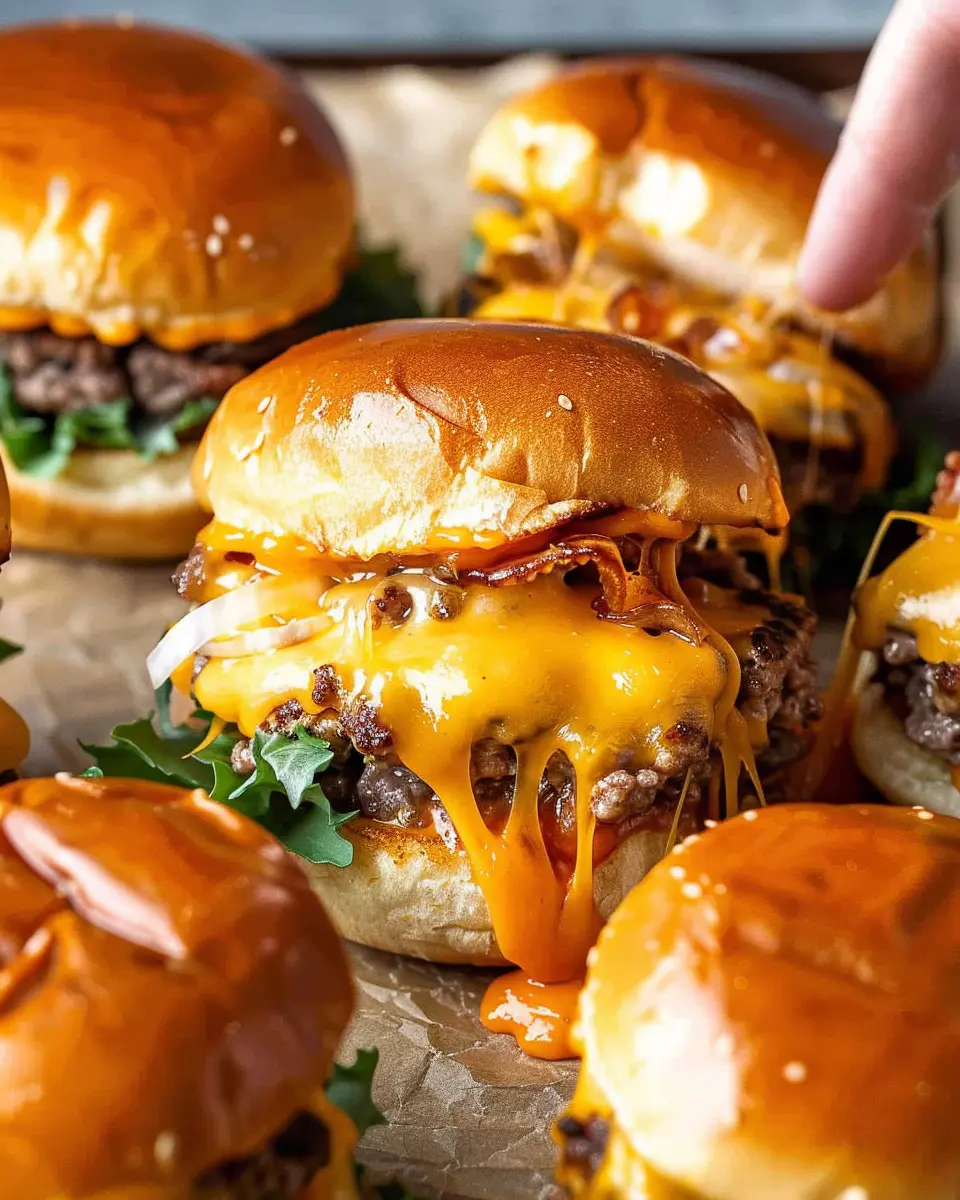
Introduction to Cheeseburger Sliders
Cheeseburger sliders are the perfect solution when you’re craving the classic burger experience but want a delightful twist! These miniature versions pack all the juicy flavor of a traditional cheeseburger into a bite-sized presentation, making them an excellent choice for game nights, gatherings with friends, or even a cozy family dinner. The appeal of cheeseburger sliders lies not just in their size, but also in their versatility; you can customize them to suit various tastes and dietary preferences.
Why Cheeseburger Sliders?
So, why should you consider making cheeseburger sliders? Here are a few compelling reasons:
-
Perfect Portions: Whether you’re feeding a crowd or just looking for something to snack on, sliders give you that perfect bite without overwhelming portions. Plus, they’re fun to eat!
-
Customization Galore: With cheeseburger sliders, you can get creative! Think of turkey bacon, chicken ham, and a variety of cheeses to choose from. Want to spice things up? Add jalapeños or a dash of your favorite sauce for an extra kick.
-
Easy to Prepare: Sliders are straightforward to make, meaning you won’t spend hours in the kitchen. In fact, these tasty bites can be whipped up in about 30 minutes.
-
Great for Any Occasion: Whether it’s a summer BBQ or a winter feast, cheeseburger sliders fit right into any menu. They are always a hit at parties, and serve as fantastic finger food for casual gatherings.
The Making of Cheeseburger Sliders
Picture this: a tray filled with warm, cheesy sliders, fresh out of the oven, topped with your favorite condiments. The aroma wafts through the air, drawing everyone in. Each bite is a delightful mix of flavors and textures, from the crispy turkey bacon to the melted cheese. It’s an experience as much as a meal.
As you prepare your sliders, consider exploring resources such as AllRecipes or Food Network for additional tips on perfecting your slider game.
Cheeseburger sliders not only satisfy your cravings but also create memories, whether you’re hosting a lively dinner party or enjoying a quiet evening at home. So gather your ingredients, unleash your creativity, and get ready to impress with these delicious bites!
Ingredients for Cheeseburger Sliders
Creating mouthwatering cheeseburger sliders is a breeze when you have the right ingredients. Let’s dive into what you’ll need to whip up these delightful mini-burgers seasoned to perfection!
Essential ingredients
To start, gather the following must-have components:
- Ground beef: Aim for a blend with around 20% fat for juicy sliders.
- Slider buns: Soft, fluffy buns are key! Hawaiian sweet rolls work especially well.
- Cheese: Classic American cheese melts to perfection, but cheddar adds a lovely sharpness.
- Condiments: Ketchup, mustard, and mayo are essential for enhancing those rich flavors.
Optional toppings
Once your sliders are cooked, it’s time to elevate them with optional toppings:
- Turkey bacon: For a little crunch, add crispy turkey bacon.
- Chicken ham: A delicious alternative that pairs well with the beef.
- Pickles, onions, or lettuce: Fresh veggies add a nice crunch and freshness.
- Special sauce: Whip up a quick sauce with mayo, ketchup, and a dash of sriracha for a delightful kick.
Experimenting with these options can yield a customizable slider experience everyone will love. You can check out resources like Serious Eats for expert tips on burger seasoning!
Step-by-step preparation for Cheeseburger Sliders
Making Cheeseburger Sliders is a fun and rewarding process that lets you create delicious and memorable bites that everyone will love. Ideal for parties or casual nights in, these sliders are easy to put together and so satisfying. Here’s a detailed step-by-step guide to help you craft the perfect sliders.
Preheat the oven and prepare baking sheet
Before diving into the cooking, let’s set the stage! Preheating your oven is essential to achieving a perfectly baked slider. Aim for a temperature of 350°F (175°C). This allows for consistent heat throughout the baking process.
While the oven is warming up, take out your baking sheet or a large oven-safe dish. You might want to line it with parchment paper or aluminum foil for easy cleanup. If you have a cast-iron skillet, that’s a fantastic option for a crispy bottom, but any suitable baking dish will work. Just ensure it’s large enough to hold all those tasty Cheeseburger Sliders!
Cook the ground beef
Next up is cooking the ground beef, which forms the heart of our sliders. Choose quality ground beef—ideally around 80/20 lean-to-fat ratio for the juiciest results. Over medium heat, add your beef to a skillet, breaking it apart with a spatula or wooden spoon.
- Cooking Instructions:
- Season the beef with salt, pepper, and your favorite spices for flavor. Consider garlic powder, onion powder, or even a dash of Worcestershire sauce for an extra depth of taste.
- Cook until it’s browned and completely cooked through, which should take about 5-7 minutes. Make sure you drain any excess fat to keep things light.
For more tips on selecting and cooking ground beef, check out this source.
Sauté the onions and mix with beef
While your beef is sizzling away, it’s time to add some aromatic goodness! Chop one medium onion into small pieces. In a separate pan, add a bit of olive oil over medium heat. Sauté the onions until they turn translucent and slightly golden, roughly 5 minutes.
Once done, mix the sautéed onions into the cooked ground beef. This combo of beef and onions will deliver a savory punch that’s impossible to resist. You can also consider adding some chopped bell pepper for added sweetness.
Assemble the slider mixture
Now that you have your flavorful beef and onion blend, it’s time to bring everything together for your Cheeseburger Sliders. In a large bowl, mix the beef and onion combination with:
- Optional Ingredients:
- 1/2 cup of shredded cheese (like cheddar or American)
- 1 egg (to help bind the mixture)
- A splash of milk (if you want a creamier texture)
Gently mix until everything is well incorporated. Here’s a tip: If you want to keep things extra fun, consider adding a bit of BBQ sauce for a smoky touch!
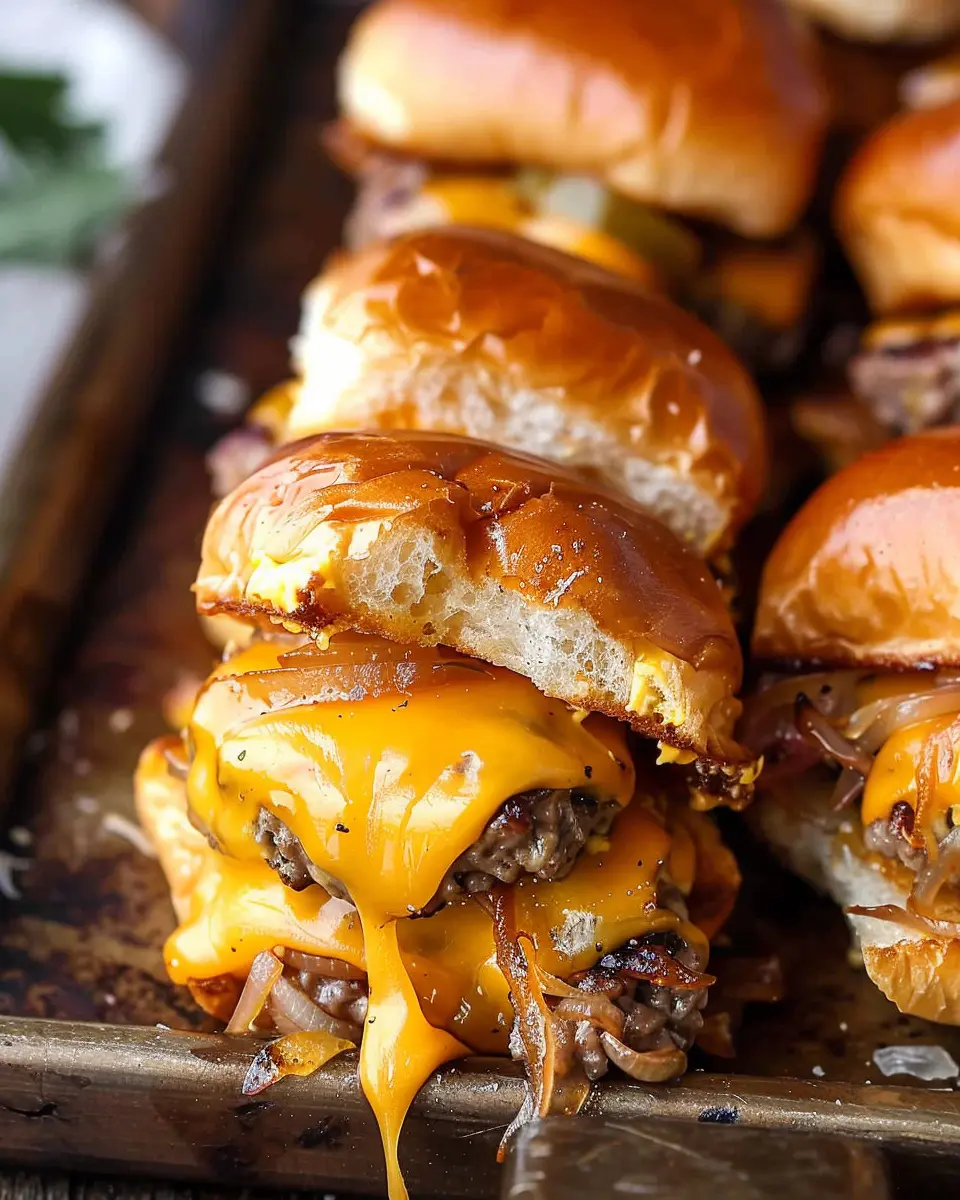
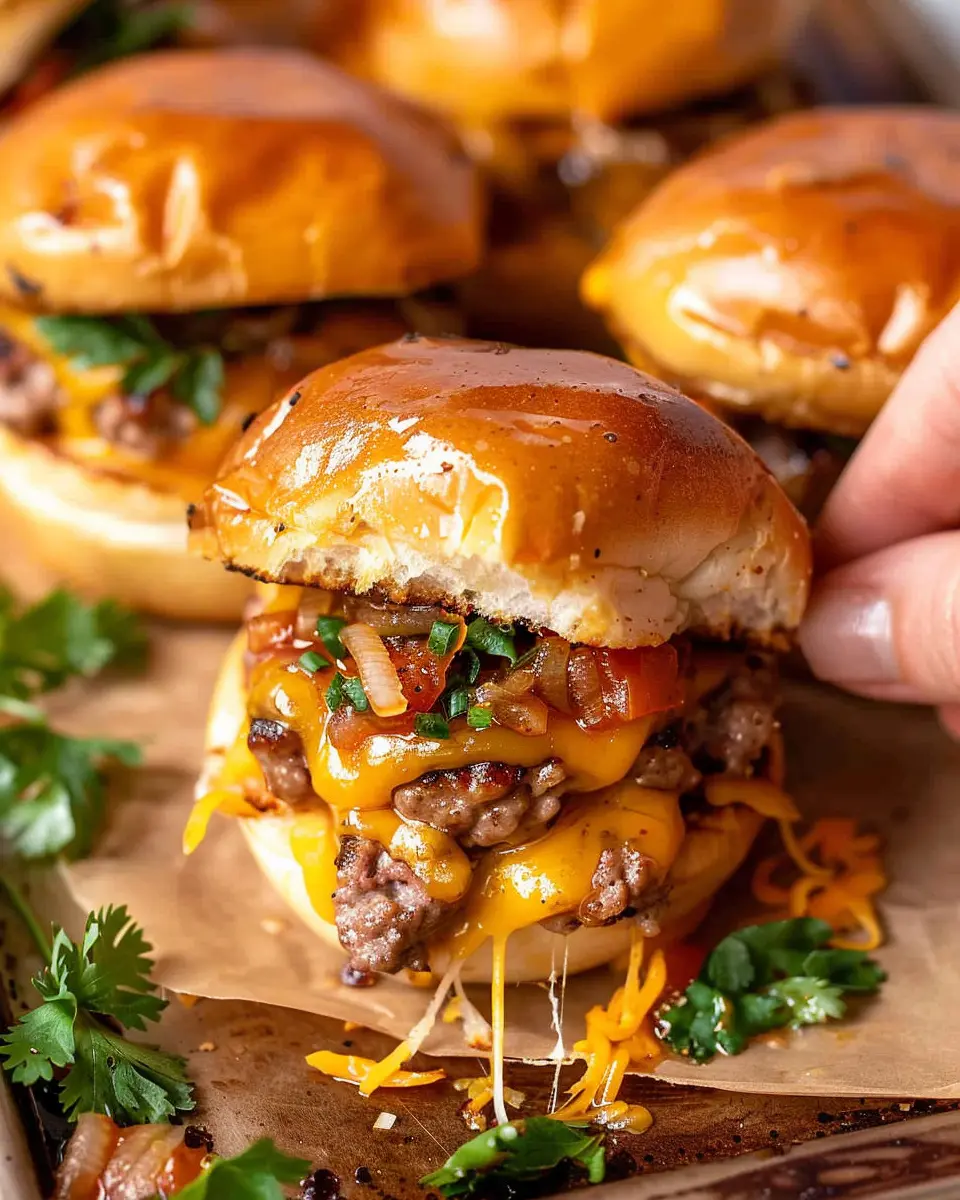
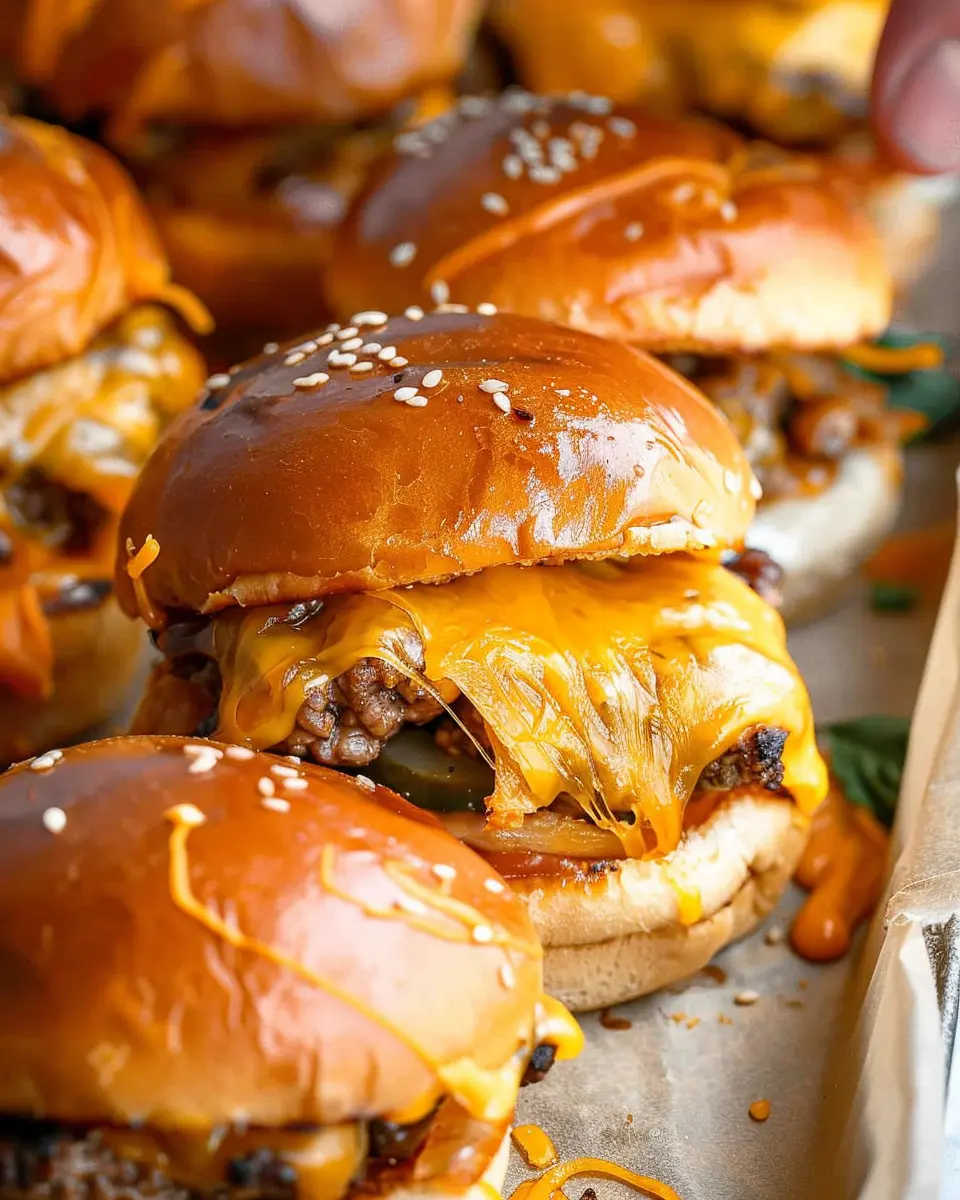
Layer the sliders and bake
With your mixture prepped, let’s assemble your sliders. Start by cutting your slider buns in half, creating a top and bottom. Place the bottom halves in your prepared baking sheet. Then, scoop generous amounts of the beef mixture onto each bun half, forming sliders that are about 2 inches thick. Top with additional cheese if desired, and finally place the top bun half over each slider.
Now cover your baking sheet with aluminum foil and place it in the preheated oven. Bake for 15-20 minutes or until the cheese is melted and bubbly. This is the moment you’ll start to notice that mouthwatering aroma filling your kitchen!
Once done, pull them out, let them cool for a moment, and watch your friends and family gather. Serve with your favorite dipping sauces or a side salad for a complete meal.
Creating Cheeseburger Sliders at home is not just about enjoying delicious food; it’s also about sharing those happy moments with others. So why not gather your friends, and let the delicious flavors do the talking? After all, there’s nothing quite like sliders hot out of the oven, perfectly cheesy and irresistibly delicious.
Variations on Cheeseburger Sliders
Who says cheeseburger sliders have to be traditional? Let’s mix things up a bit! Here are two scrumptious variations that will take your cheeseburger sliders to new heights.
Spicy Cheeseburger Sliders
If you’re a fan of heat, these spicy cheeseburger sliders are calling your name. Start with your regular beef patties, but add a kick by mixing in diced jalapeños or a few teaspoons of your favorite hot sauce to the meat before grilling. You might also consider topping these sliders with pepper jack cheese for that extra zing.
- Additions: Incorporate chipotle mayo or sriracha mayo to the slider for creamy heat.
- Serving Suggestion: Serve alongside a side of crunchy pickles to balance the spice.
Feeling adventurous? You could even incorporate crushed red pepper flakes or a dash of cayenne into your seasoning for an unexpected twist.
Veggie Cheeseburger Sliders
Perfect for meatless Mondays or if you just want a lighter option, veggie cheeseburger sliders are a savory delight. Use black beans, quinoa, or even lentils as the base. You can easily find great recipes online that guide you through making these delicious patties, ensuring full flavor with every bite.
- Additions: Load up your veggie sliders with fresh toppings like avocado slices or a dollop of guacamole.
- Serving Suggestion: Pair with a zesty yogurt sauce or a tangy Greek dressing for extra flavor.
No matter which variation you choose, cheeseburger sliders are versatile and can be customized to suit any palate. For more details on slider variations, check out this handy guide or explore the numerous topping options available to elevate your slider game!
Cooking Tips and Notes for Cheeseburger Sliders
Tips for Perfect Sliders
Making the ultimate Cheeseburger Sliders is about the details! Here are some tips to ensure your mini burgers are a hit:
- Use Fresh Ingredients: High-quality ground beef and fresh toppings make a noticeable difference. Opt for 80/20 beef for juicy sliders.
- Don’t Overmix: When forming your patties, mix just enough to combine the meat with seasonings. Overworking can lead to tough sliders.
- Cooking Time: Aim for a medium-rare slider, about 3-4 minutes per side. You can ‘cheat’ a bit by adding cheese last minute so it melts perfectly.
How to Store Leftovers
Storing your Cheeseburger Sliders properly keeps them delicious for the next meal! Here’s how:
- Refrigerate: Place any leftover sliders in an airtight container. They should stay fresh for 3-4 days.
- Freezing: To enjoy later, wrap each slider individually in plastic wrap and store them in a freezer bag. They’ll be good for up to 3 months!
Next time you whip up a batch, consider adding your favorite condiments for added flavor. Enjoy your slider experience! For more tips, check out FoodSafety.gov on safe food storage guidelines.
Serving suggestions for Cheeseburger Sliders
Pairing sides and drinks
When it comes to enjoying your Cheeseburger Sliders, the right sides and beverages can elevate your meal to a new level. Classic choices like crispy sweet potato fries or a zesty coleslaw provide a delightful crunch and contrast to the savory flavors of the sliders. For a fresh twist, consider a vibrant garden salad topped with a tangy vinaigrette.
As for drinks, light and refreshing options work wonders. Sparkling lemonade or iced tea pairs nicely with the rich flavors of the sliders. If you’re feeling adventurous, try crafting a homemade fruit-infused sparkling water — it’s both delicious and visually appealing!
Presentation ideas
Creating a captivating presentation can make your Cheeseburger Sliders the star of the show at any gathering. Arrange the sliders on a large wooden board, garnished with fresh herbs or pickled vegetables for a pop of color. You might also consider using individual mini platters, allowing guests to customize their sliders with various toppings and sauces.
To make the experience even more engaging, include fun sliders flags or mini chalkboard signs indicating different flavors or toppings. This simple touch can spark conversation and excitement at your next gathering.
For more inspiration on serving and presentation, check out foodstyling sites like Food52 for creative ideas!
Time Breakdown for Cheeseburger Sliders
Preparation Time
Getting those flavor-packed cheeseburger sliders ready is a breeze! You’ll need about 10 minutes to gather your ingredients, chop any toppings, and shape your patties.
Cooking Time
Once you’re ready to grill or bake, the cooking phase will take approximately 15-20 minutes. Keep an eye on them; you want that juicy beef perfectly cooked and the cheese melted just right.
Total Time
In total, you’re looking at around 30 minutes from start to finish. Perfect for a weeknight dinner or when friends come over! For tips on making sliders ahead of time, check out this handy guide that highlights easy meal prep ideas.
Enjoy your time in the kitchen and happy cooking!
Nutritional Facts for Cheeseburger Sliders
When it comes to enjoying Cheeseburger Sliders, it’s good to know what you’re indulging in. These tasty bites can fit nicely into a balanced diet if enjoyed mindfully. Here’s a quick look at their nutritional profile:
Calories
Each slider typically contains around 250 calories, making them a satisfying yet manageable option for snacking or a light meal.
Protein
With approximately 15 grams of protein per slider, these little gems pack a nutritious punch. That’s an excellent way to support muscle health, especially after a workout.
Sodium
Watch out for sodium levels—they can reach about 500 mg per slider. To keep your meal heart-healthy, consider using lower-sodium ingredients or adjusting portion sizes.
For more insights into healthy eating, you can check resources like the USDA FoodData Central or the American Heart Association, which offer fantastic information on nutrition and healthy lifestyles. Remember, moderation is key, and enjoying your Cheeseburger Sliders in a balanced way will ensure they remain a delightful part of your dining experience!
FAQs about Cheeseburger Sliders
Can I make these sliders ahead of time?
Absolutely! Cheeseburger sliders are perfect for meal prep. You can form the patties ahead and store them in the fridge for up to a day. If you’re looking to take your prep a step further, consider cooking them in advance, allowing them to cool and then storing them in an airtight container. When you’re ready to eat, just pop them in the oven at 350°F (175°C) for about 10 minutes, or until warmed through. For an extra flavor boost, reheat with a slice of cheese on top!
What can I substitute for ground beef?
Not a fan of ground beef? No problem! The beauty of cheeseburger sliders is their versatility. Here are a few tasty alternatives:
- Ground turkey: A leaner option that still packs a punch.
- Ground chicken: If you’re looking for a lighter taste, this can be a wonderful swap.
- Veggie patties: For a plant-based twist, try black bean or chickpea patties.
- Beyond Meat or other meat alternatives: Great for those craving a similar texture to beef.
With these substitutes, you can cater to different dietary preferences without sacrificing flavor!
How do I freeze leftover sliders?
If you end up with leftover cheeseburger sliders, freezing them is a smart choice! Here’s how:
- Allow the sliders to cool completely.
- Wrap each one in plastic wrap or aluminum foil.
- Place them in a freezer-safe bag or container. Be sure to label it with the date for reference.
They can be frozen for up to three months. When you’re ready to enjoy them again, just thaw in the fridge overnight and reheat in the oven or microwave. Easy peasy!
For more tips on food preservation, check out resources from the USDA Food Safety and Inspection Service.
Conclusion on Cheeseburger Sliders
Recap of the joy of homemade sliders
There’s something undeniably satisfying about crafting your own cheeseburger sliders at home. Not only do they allow you to customize flavors to your heart’s content, but they also bring a fun, communal eating experience to your table. Imagine friends gathering around, each grabbing their own perfectly sized slider—it’s a recipe for memories!
Whether you prefer classic or adventurous toppings, these little delights are a guaranteed crowd-pleaser, proving that good food can indeed bring people together. So next time you’re entertaining, whip up a batch of cheeseburger sliders and share some laughs over this grilled goodness. For more food inspiration, consider checking out The Kitchn or Serious Eats.
PrintCheeseburger Sliders with Turkey Bacon: A Juicy Homemade Delight

Enjoy a delicious twist on classic cheeseburgers with these turkey bacon sliders, perfect for any gathering.
- Prep Time: 15 minutes
- Cook Time: 20 minutes
- Total Time: 35 minutes
- Yield: 12 sliders 1x
- Category: Main Dish
- Method: Baking and Skillet Cooking
- Cuisine: American
- Diet: Paleo
Ingredients
- 1 pound ground turkey
- 8 slices turkey bacon
- 1 cup shredded cheddar cheese
- 1 tablespoon Worcestershire sauce
- 2 teaspoons garlic powder
- 1 teaspoon onion powder
- 1 teaspoon black pepper
- 12 slider buns
- 1 tablespoon olive oil
Instructions
- Preheat your oven to 350°F (175°C).
- In a large bowl, combine ground turkey, cooked turkey bacon (chopped), cheese, Worcestershire sauce, garlic powder, onion powder, and black pepper.
- Form the mixture into small patties.
- Heat olive oil in a skillet over medium heat and cook patties until browned on both sides.
- Place the patties on slider buns and top with additional cheese, if desired.
- Bake in the oven for about 5 minutes until the cheese is melted and buns are slightly toasted.
- Serve warm with your favorite toppings.
Notes
- For extra flavor, add your favorite condiments on top.
- Try different types of cheese for variety.
Nutrition
- Serving Size: 1 slider
- Calories: 250
- Sugar: 2g
- Sodium: 450mg
- Fat: 12g
- Saturated Fat: 3g
- Unsaturated Fat: 7g
- Trans Fat: 0g
- Carbohydrates: 20g
- Fiber: 1g
- Protein: 18g
- Cholesterol: 70mg
Keywords: Cheeseburger Sliders